• Laser Scanner
• 36" (91.4 cm) Range
• 24" (70 cm) Read Width
• 4 mil resolution
• 100 scans per second
• FCC and CE approved
• Enhanced Durability
• Fully Programmable
• Reads All Common 1D Codes
• USB and PS2 Interfaces
• With Free QuickTrack Start Item, Asset Tracking Software
• 1 Year Warranty
QuickUses
• Retail
• Healthcare and Medical
• Inventory and Stock Control
• Office Automation
• Document Tracking
• Light Industrial
• Asset Tracking
• Item Tracking
• Library Applications
• Goods Receiving
• Goods Shipping
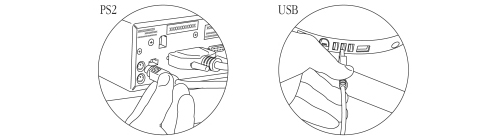
Turn off the power on your computer (unless you have a USB connection, when this is not necessary).
Connect your Peninsula Eagle I Bar Code Reader to a spare port on your computer.
You will already have specified the connection type (USB or PS2) on ordering your reader.
• Do not plug USB connections into the keyboard. The keyboard does not have enough
power to power the reader and damage may occur. If you are using the Windows 95
operating system you may be required to install additional software from your
Windows 95 system installer disc.
• Do not plug Keyboard Wedge (PS2) connections into the mouse port. Always connect the
reader between the keyboard and the computer.
Turn on the computer. The reader will beep to indicate that it is being initialised.